Bank Reconciliation System Documentation 
Experiencing problems…? Try searching our Frequently Asked Questions for a solution.
-
1.BRS Installation
 nikki
nikki 18-10-2016
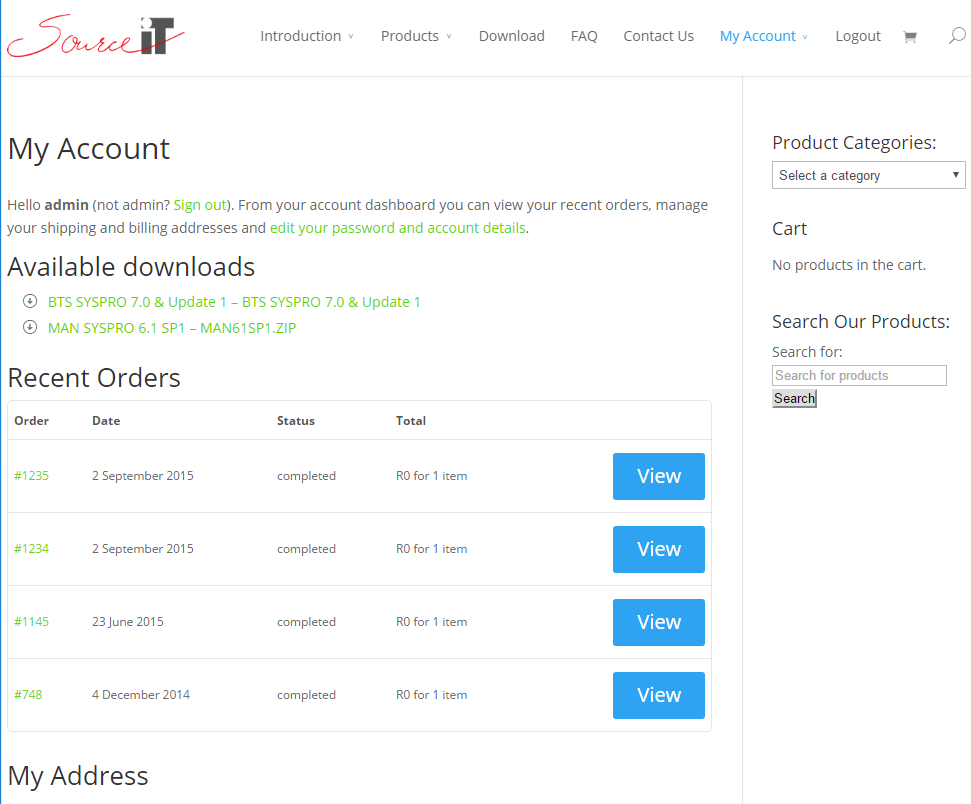
The BRS installation files are specific for each version of SYSPRO and are available for download from the Source IT website: http://www.source-it.co.za/product-category/software/brs/
You will be required to login using your once-off registered user account to perform the download.
Simply add the required download file to the "cart" and follow the "checkout" process to complete the order.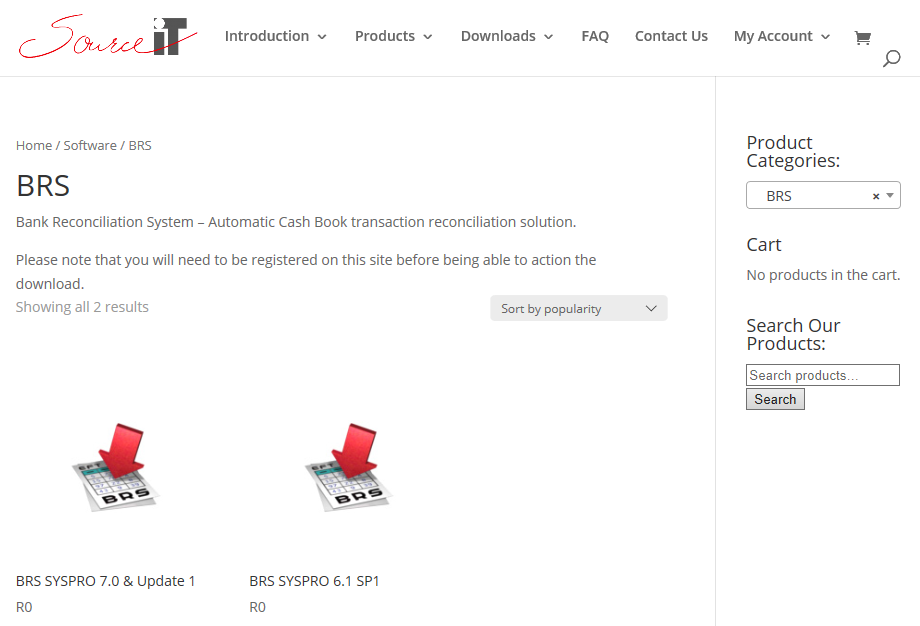
An email will be sent to your email address containing hyperlinks that will facilitate the download.
Alternatively, these "orders" with the hyperlinks will also be available on "My Account" page once you are logged in.
 Was this helpful?
 0
0 0
0
Hits: 211- nikki18-10-2016
Load Programs onto SYSPRO Server
To install the BRS product, follow the same process as per a SYSPRO port upgrade.
Simply unzip the downloaded file place the executable in the SYSPRO base upgrade directory on the Server.
Once that is done, logon on to SYSPRO as an administrator and the following message will be displayed as per Figure 1.1.1
Figure 1.1.1
Yes – a screen as per Figure 1.1.2 will be displayed.
No – the installation will abort.
Figure 1.1.2
This screen will list all the BRS program files and will display the SYSPRO folder on the server into which they will be placed.
Select the “Start Upgrade” button and the message as per Figure 1.1.3 will be displayed.
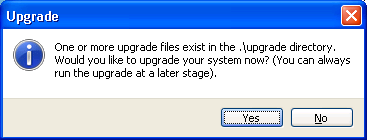
Figure 1.1.3
Yes – the associated BRS program files will be loaded into their relevant SYSPRO folders on the SYSPRO server.
No – the installation will abort.Once the installation has completed successfully, a message as per Figure 1.1.4 will be displayed and it will automatically log you out of SYSPRO.

Figure 1.1.4
Was this helpful?00
Hits: 174 - nikki18-10-2016
Initialise the BRS System
The BRS programs now reside in the relevant SYSPRO directories and need to be initialised.
This program needs to be run straight after the BRS programs have been installed. It will set up the following:- BRS menu in SYSPRO
- BRS programs security options in SYSPRO
- BRS file re-indexing options in SYSPRO
To run the initialisation process the following needs to be done:
- Login into SYSPRO as an Administrator
- From the SYSPRO menu, select File / Run and a screen as per Figure 1.2.1 will be displayed.
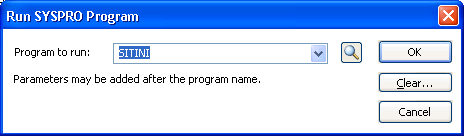
Figure 1.2.1
Next to ‘Program to run:’ type in SITINI and press the “OK” button
A screen as per Figure 1.2.2 will be displayed.
Figure 1.2.2
The following options need to be ticked for BTS to be initialised successfully:
- Create or remove menu
- Create or remove security access
- Create or remove re-indexing of files
If any of the menu, security access or re-indexing of files already exist in the relevant files, this process will remove them.
The Source IT initialisation process will always ascertain whether a custom programs directory has been set up and will use an existing one. If one has not been set up and the System administrator does not wish to manually create one, this program will automatically create one and update the relevant fields in SYSPRO. This directory will be created as a sub-directory within the main SYSPRO directory on the server and will be called ‘cusprog’. (See Figure 1.2.3)

Figure 1.2.3
Create or remove menu - this option will setup the BRS menu in SYSPRO as per Figure 1.2.4.
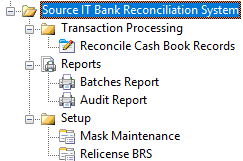
Figure 1.2.4
If the BRS menu already exists, a warning message will be displayed to the user as per Figure 1.2.5.

Figure 1.2.5
Create or remove security access - this option will setup the BRS programs into the SYSPRO security access menu. To deny/allow access to the various BRS programs the following steps need to be taken:
From the SYSPRO menu select “Setup” > “Groups…” then select a group that will be using the BRS system and select “Edit” and “Change…” and a screen as per Figure 1.2.6 will be displayed.

Figure 1.2.6
On the "Security Access" window, locate the "BRS Conversion System" module, tick the "Access Allowed" tickbox to give permissions to this Group.
Create or remove re-indexing files - this option will add the BRS data files to the SYSPRO Data Dictionary so that they may be re-indexed in the same manner as the SYSPRO ISAM data files. Please note that if you are running SQL, all BRS files will still be created as C-ISAM and will reside in the SYSPRO data directory.
If the BRS programs already exist in the SYSPRO security access files, a
warning message will be displayed to the user as per Figure 1.2.7
Figure 1.2.7
To re-index the BRS files the following needs to be done:
From the SYSPRO menu, select “File” > “Re-index data files” and a list of all SYSPRO data files will be displayed. Go to the end of the list and the BRS files should be listed as per Figure 1.2.8
Figure 1.2.8
If the BRS files already exist in the SYSPRO data dictionary, a warning message will be displayed to the user as per Figure 1.2.9
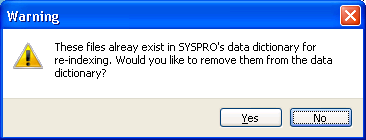
Figure 1.2.9
Once the Source IT initialisation program has successfully completed, the following message will be displayed as per Figure 1.2.10

Figure 1.2.10
OK – will automatically log the user out of the SYSPRO session.
NOTE:
When running SITINI, either to create or remove options from SYSPRO, please ensure that the correct version of SITPRG, SITMEN and SITFIL are sitting in SYSPRO’s programs directory. There are several Source IT packages using a generic installation, one overwrites the other.Was this helpful?00
Hits: 200 - nikki18-10-2016
Licensing Process
If the user wishes to license BRS or re-license BRS, the program is found under the "Source IT Bank Reconcilliation System" menu as per Figure 2.4.5

Figure 2.4.5
If it’s the first time BRS is being run, Figure 2.4.5.2 will be displayed.
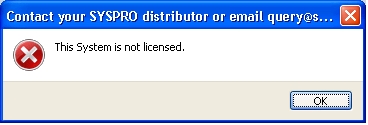
Figure 2.4.5.2
Contact your SYSPRO distributor or Source IT to obtain license codes.
To contact Source IT, you may email your request to cotact us via the Source IT Contact page or alternatively phone +27 11 781 4000.By clicking on OK, Figure 2.4.5.3 will be displayed.
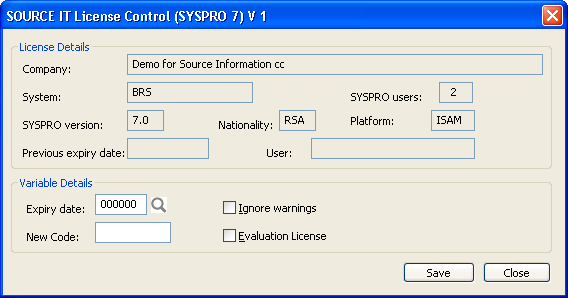
Figure 2.4.5.3
Expiry date – enter the license expiry date as. To ensure correct date format, make use of the date browser to select the expiry date.
New Code – enter the license code as issued by the Source IT offices.
Save – will validate the entered values and verify if the license code is valid for the expiry date based on specifics pertaining to the SYSPRO registered company currently logged into. If deemed valid, the information will be stored as entered.
Close – will exit the program without validating the information on the screen. If the “Ignore warnings” tickbox status was modified, the new setting will be applied to the license validation process in the future.The license process is written to provide a warning message each time it is run in the expiry month indicating the number of days until the license expires (see figure 2.4.5.4).
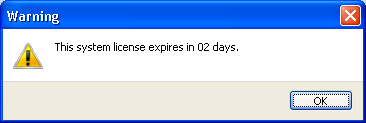
Figure 2.4.5.4
The following information needs to be relayed to the relevant person who will be obtaining your license codes with the exact spelling and case (upper/lower) as per the example in figure 1.3
- Company
- System
- SYSPRO users
- Platform (ISAM)
- SYSPRO version (7.0)
Ensure that both the “Ignore warnings” and “Evaluation License” tickboxes have been UNTICKED.
The relevant “Expiry date” and “New Code” values must be entered and the “Save” button selected.The BRS User Manual will explain the detailed functioning of the various BRS processes.
Was this helpful?00
Hits: 98 - admin28-11-2018
If you have been running BRS since before December 2018 and you have subsequently downloaded the current BRS, you will notice that the product has evolved somewhat.
If your previously unreconciled bank statement transactions are not showing in the new BRS solution, there is a need to manually run an import utility.
Please contact the Source IT offices or email query@source-it.co.za and we will revert back to you with the appropriate solution.
Was this helpful?00
Hits: 71 - admin28-11-2018
1 System Description
The Bank Reconciliation System (BRS) is an emulation of the SYSPRO Automatic Bank Reconciliation utility which is found within the Cash Book Menu. BRS translates the electronic statement from the associated financial institution and then matches the transactions on the electronic statement against the SYSPRO Cash Book transactions. When a correct match is determined, the relevant SYSPRO Cash Book transaction is flagged as reconciled. Un-reconciled bank statement transactions are stored by the BRS module for future matching attempts. All transactions, whether reconciled or not are represented on a report.
Once bank statements have been imported into BRS, the following functions are available:- Manual Reconciliation Flagging - Where duplicate entries prevent automatic reconciliation, manually select a statement transaction and a Cash Book and action the reconciliation of the SYSPRO Cash Book entry.
Select multiple bank statement transactions to be reconciled against a single SYSPRO Cash Book entry and vice versa - Manual Cash Book Transaction Creation - Generate Cash Book entries into SYSPRO from any of the selected bank statement transactions
- Automatic Cash Book Transaction Creation - Cash Book transactions may be automatically generated in SYSPRO using a masking function which allows the user to specify specific matching rules. This masking functionality will also delete statement entries if not required
- Generate SYSPRO AR Payments From Deposit Entries - Deposit entries on the electronic statement may be used to quickly allocate payments against Customers in SYSPRO from within the BRS process. This process will also leave the bank statement transaction in the BRS system to allow for automatic reconciliation of the resulting Cash Book entry to be reconciled once it has been generated by the printing of the bank deposit slips.
2 System Overview
The automatic BRS module allows for the user to select the definition of the input electronic statement file from the financial institution allowing the BRS module to correctly translate the statement. This is a selection ONLY option and the associated list contains the different bank file types that the user must select. It is important for the user to know which bank file they are using (i.e. it is not sufficient to know which bank you use, you must know whether the file is in Ascii or Delimited format etc.)
Once the user has selected the file definition, a program that is linked to this file definition is automatically used for the translation. This program takes the electronic statement file from the bank and converts it into a standard layout to facilitate the reconciliation of the transactions.
Make sure that the file received from the bank is known to you before you start this process. There are also multiple electronic statement formats from some banks, so be sure to know what the layout is of the file you are going to process.
If you chose the incorrect bank format for the file you want to reconcile, the reconciliation process will not be successful and will produce a report indicating the errors encountered.
The reason for this functionality is purely because the different banks use completely different layouts for their bank statements. The objective of this solution is to take the different layouts from the different banks and convert the records into the layout that the automatic Bank Reconciliation System program requires.The user may import a file and all the results from the reconciliation attempt using the statement transactions are represented on an associated report:
- Unreconciled Statement records
- Non-translatable Statement records
- Reconciled Cash Book
- Un-reconciled Cash Book:
All un-reconciled transactions are written into the BRS module allowing for future attempts to reconcile the transactions against the SYSPRO Cash Book transactions. This is relevant when the SYSPRO Cash Book transactions are only generated subsequent to importing those same transactions from the statement file.
This version of BRS incorporates the following functionality:
- Smart Reconcile: Provision has been made for the user to manually link transactions from both the bank statement and SYSPRO Cash Book to allow simplistic reconciliation of transactions that have not been matched due to factors such as duplicate values.
Select multiple bank statement transactions to be reconciled against a single SYSPRO Cash Book entry and vice versa - Manually Create Cash Book Transactions: Generation of SYSPRO Cash Book transactions in SYSPRO based on the electronic bank statement transactions. In this case, the SYSPRO Cash Book Transaction has not yet been captured when the associated bank transaction is encountered and the user may initiate the creation of the SYSPRO transactions from the BRS module.
- Automatic Cash Book Transaction Creation: The user may configure a BRS Mask setup which will allow for the automatic creation of Cash Book transactions based an matching of specific text on the bank statement reference, narration or trans code entries on the transactions. A good example is the account interest or monthly charges.
- Allocate payments against customer from deposits: Enter or browse to select your Customer and simply select the specific invoices to allocate the payment against that Customer based on the deposit amount on the statement.
Select multiple unpaid invoices totaling up to the statement deposit amount and payments will be applied against those invoices.
The undistributed value is displayed as you select the customer invoice and displays in red once the deposit has been fully distributed.
Simply allocate an unapplied payment against a SYSPRO Customer to allow invoice allocation manually at a later stage.
Once the deposit has been allocated, by selecting the "Create Payment" button, BRS will automatically create the associated AR Payments against the associated customer and the bank statement entry will turn green indicating that it has already been used to generate AR Payments and the user will only be allowed to reconcile or delete this entry.
Once the user has printed the bank deposit slip and the relevant Cash Book entry has been created, it will be possible to allow the "green" bank statement entries to automatically reconcile the Cash Book entry.
(Please note - this payment allocation is only available from SYSPRO 7 onwards)
Was this helpful?00
Hits: 129 - Manual Reconciliation Flagging - Where duplicate entries prevent automatic reconciliation, manually select a statement transaction and a Cash Book and action the reconciliation of the SYSPRO Cash Book entry.
- admin28-11-2018
Once BRS has been installed and the Source IT initialisation program has been run, the following menu structure would have been added to the SYSPRO menu.
Was this helpful?00
Hits: 171 - admin28-11-2018
Once the user selects the “Reconcile Cash Book Records” option from the “Source IT Bank Reconciliation System” / “Transaction Processing”, the following screen will be displayed:

Enter or browse on a SYSPRO Bank and tab/enter off to retrieve information relating to BRS.
Import: When this button is selected, the process will attempt to import the associated statement transaction files handling the translation as configured by the below settings. (NOTE: this process will use the entered ‘General Ledger code for CB’ and ‘General Ledger notation for CB” fields to update the associated banks statement transaction fields)
Reconcile: When this button is selected, the process will attempt to perform the reconciliation of the associated statement transaction against the SYSPRO unreconciled Cash Book transactions handling the process as configured by the below settings. (NOTE: this process will use the entered ‘General Ledger code for CB’ and ‘General Ledger notation for CB” fields to update the associated banks statement transaction fields)
Maintain Masks: When this button is selected, the Mask Maintenance program will be called (See BRS Mask Maintenance section below)Actions and Settings

Function:
- Validation: This option will instruct the program to handle the “Import” and “Reconcile” actions in a validation mode to represent the results without updating any SYSPRO or BRS tables.
- Process: This option will instruct the program to make the modifications to the SYSPRO and BRS files based on the selected settings when either the “Import” or “Reconcile” actions are selected.
Reconcile from:
- All: Retrieve input data from both the BRS files and any statement files waiting to be imported for reconciliation.
- New files: Retrieve input data only from any new statement files waiting to be imported into BRS.
- Previously unreconciled state: Retrieve input data only from the statement transactions that were previously imported into BRS and have not yet been reconciled.
Reconcile deposit setting:
This setting will be used as the matching rules associated to how the deposit transactions on the statement are reconciled against the Cash Book deposit transactions.
- Value only: Select this to reconcile transactions automatically only if the entry at the value field in the statement import file matches the entry at the value field in the Cash Book transaction file.
- Value and date: Select this to reconcile transactions automatically only if the entries at the value and date fields of the statement import file match the entries at the value and date fields of the Cash Book transaction file.
- Value, date and reference: Select this to reconcile transactions automatically only if the entries at the value, date and reference fields in the statement import file match the entries at the value, date and reference fields in the Cash Book transaction file.
Reconcile withdrawal setting:
This setting will be used as the matching rules associated to how the withdrawal transactions on the statement are reconciled against the Cash Book withdrawal transactions.
- Value only: Select this to reconcile transactions automatically only if the entry at the value field in the statement import file matches the entry at the value field in the Cash Book transaction file.
- Value and date: Select this to reconcile transactions automatically only if the entries at the value and date fields of the statement import file match the entries at the value and date fields of the Cash Book transaction file.
- Value, date and reference: Select this to reconcile transactions automatically only if the entries at the value, date and reference fields in the statement import file match the entries at the value, date and reference fields in the Cash Book transaction file.
Posting year: This indicates the year to be used when posting a transaction
Posting period: This is the period that will be used when posting a transaction
You can post transactions to the current, previous one or previous two months, providing the access status for the period is set to Open in all the applicable modules and the ledger period to which you want to post the transaction is Open within the relevant module and within all the integrated modules.
Selecting the Posting period button allows you to indicate the posting month to which you want to post transactions.Match withdrawal check number: Selecting this option will include the check number in the reconciliation process.
Process masks after reconcile: Selecting this option will automatically run the mask procedures after the reconcile routine has completed.
Import Bank Statements

Bank format: use the browse to view a list of the available statement formats for the existing financial institutions. Select the correct format from the list.

File path: enter or use the browse option to specify the folder location of the statement files
File name: enter the full path and name of a single statement file to be imported. Leaving this folder blank will automatically import any valid files as specified in the above File path.
Wildcard: This is useful when more than one bank is used in the BRS system and all the bank statements are all placed in the same File path. If the Wildcard is entered, only files in the File path that have this Wildcard in the name of the file will be processed. This field will be ignored if the File name is entered.
General Ledger code for CB: enter or use the browse option to specify the General Ledger code to be used when importing the bank statement and will populate the "Ledger Code 1" field in the "Unreconciled Statement records" and which may be used when generating the associated SYSPRO Cash Book entry.
General Ledger notation for CB: enter a notation value to be when importing the bank statement and will populate the "Ledger Note 1" field in the "Unreconciled Statement records" and which may be used when generating the associated SYSPRO Cash Book entry.
These General Ledger fields are used when the user selects one of the “Unreconciled Bank Statement Transactions” in the list and selects the “Cash Book” button which will generate the associated SYSPRO Cash Book entry.Transaction Reports

Unreconciled Statement records: this report represents the records from the bank statement that were NOT matched to the Cash Book records as well as a reason they were not matched.
Non-translatable Statement records: all records on the Bank statement files that have been rejected will appear on the report if you have this option ticked. The valid layout records that have been rejected will have an “R” in the Type. The blank or miscellaneous layout records will have an “X” in the Type as well as XXX in all the fields as they are non-translatable.
Reconciled Cash Book: this report shows the Cash Book records reconciled against the electronic bank statement file. The number at the beginning of each line represents the physical bank statement record that has been reconciled.
Un-reconciled Cash Book: this report shows the records that remain un-reconciled in the Cash Book after the reconciliation process.Email address when silent mode: This email is used to email the above selected reports when the BRS is running in silent mode.
BRS Information
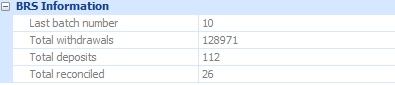
Last batch number: the batch number of the last reconciliation process that ran.
Total withdrawals: total withdrawal transactions imported.
Total deposits: total deposit transactions imported.
Total reconciled: total transactions reconciled in the Cash BookCash Book Information
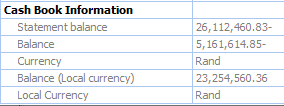
Statement balance: Cash Book statement current balance for current period.
Balance: Cash Book current balance for current period as per currency of bank
Currency: currency of SYSPRO Bank.
Balance (Local currency): Cash Book current balance for current period in local currency
Local currency: local currencyUnreconciled Bank Statement Transactions

When this listview is loaded, the first 100 Bank Statement transactions will be listed.
More Lines: if more transactions are available to be loaded into the listview, this will load the next 100 lines. The button is deactivated when all available transactions have been listed.
Show All: will retrieve and load ALL of the statement transactions into the listview. The button is deactivated when all available transactions have been listed.
Select All: will select all of the statement transactions in the list.
Deselect All: will un-select all of the statement transactions in the list.
Delete: will delete all of the selected statement transactions in the list. Only available when Function is set to “Process” mode.
Masks: will run the procedure to take the actions against all the unreconciled transactions as defined in the ”Maintain Masks” setup. Only available when Function is set to “Process” mode.
Cash Book: will generate a Cash Book transaction in SYSPRO for each selected unreconciled transaction using the “General Ledger code for CB” and “General Ledger notation for CB” above. Only available when Function is set to “Process” mode.
AR Payments: when a single deposit is selected (that has not already had an AR Payment processed against it), the screen as per the figure below will be shown.Only available when Function is set to “Process” mode.AR Payments Processing

Customer: The first value in the statement reference will be validated against the SYSPRO Customer master table and if valid will populate the Customer field to speed up the allocation process. If not, the SYSPRO Customer can be entered or found in the available browse.
A/R Payment Details:
Journal notation: optional field that may not exceed 50 characters.
Payment narration: optional field that may not exceed 50 charactersUnapplied payment:
Create an Unapplied Payment: select this tick box to indicate that an unapplied payment must be included in this payment allocation process.
Highest use _CR: allows modification on this value
Suffix for Unapplied Payments: allows modification on this value
Unapplied Gross: automatically defaults to the remaining "undistributed amount" and allows for the value to be modified
Unapplied Discount: allows for entry of an unapplied discount value to be entered
Unapplied Nett: displays the nett value of the Unapplied values entered aboveDistributed Values:
Distributed amount: displays the amount that has been distributed based on the selected invoices and/or unapplied payment entry.
Undistributed amount: displays the remaining value still to be allocated against the payment amount and once this value gets to zero, it turns red and the "Create Payment" button is activated allowing for the process to be actioned.Unpaid A/R Invoices:
The user is able to select any of the available unpaid invoices to have this payment applied to and although the discounts are automatically calculated for each selected invoice, the following fields may be modified.
Discount amount: this value may be modified
Gross amount: this value may be modified llows modification on this valueOnce the deposit has been allocated, by selecting the "Create Payment" button, BRS will automatically create the associated AR Payments against the associated customer and the bank statement entry will turn green indicating that it has already been used to generate AR Payments and the user will only be allowed to reconcile or delete this entry.
Once the user has printed the bank deposit slip and the relevant Cash Book entry has been created, it will be possible to allow the "green" bank statement entries to automatically reconcile the Cash Book entry.Unreconciled Cash Book Transactions

When this listview is loaded, the first 100 unreconciled Cash Book transactions will be listed. Selecting an entry in the list view will display the additional Cash Book details in the “Cash Book Information” screen.
More Lines: if more unreconciled Cash Book transactions are available to be loaded into the listview, this will load the next 100 lines. The button is deactivated when all available transactions have been listed.
Show All: will retrieve and load ALL of the unreconciled Cash Book transactions into the listview. The button is deactivated when all available transactions have been listed.
Reconcile: will initiate the reconciling of the selected “Unreconciled Cash Book Transactions” against the selected “Unreconciled Bank Statement Transactions”. This process will tally up the transactions and prompt the user with a summary screen requesting permission to proceed in the case of differing amounts.
Find Match / Refresh Rows: the "Find Match" button will search for any unreconciled Cash Book transactions with the same transaction value as the selected statement transaction and they will be listed. When the selected statement transaction is unselected, the button text will change to "Refresh Rows" allowing the user simply select to list the first 100 unreconciled Cash Book transactions.Was this helpful?00
Hits: 271 - admin28-11-2018
This program stores the masking rules as defined by the user. The following screen will be shown.

Selecting the “Add” or “Change” icons will show a maintenance window as per screen below.
Delete option will remove the highlighted entry.
Selecting the “Start” icon will prompt for the SYSPRO Bank code to position the list view.
BRS Mask Key Information
These 3 fields represent the key of this mask record.
Bank: enter or browse to select a SYSPRO Bank Code
Look in field: choose which of the available fields from a drop-down list that must be checked for the specified value.
Look for value: enter the specific set of characters that must be searched for in the field specified above.BRS Mask Details
These fields define the rules to be applied once the statement transactions have been identified by the above mask key.
Description: describes this mask rule
Apply to: choose between “Deposits” or “Withdrawals”.
Action to be taken:
This setting determines the action to be taken based on the identified statement transactions as per the above mask key.- Create Cashbook Record: this option will automatically generate a SYSPRO Cash Book transaction using the General Ledger code and Journal notation entries below.
- Delete Statement Record: this option will automatically delete the statement transaction entry from the BRS system.
G/L Code: General Ledger code to be used for the Cash Book journal transaction
Journal notation: Journal notation to be used for the Cash Book journal transactionWas this helpful?00
Hits: 132 - admin05-12-2018
BRS now has the ability to run in a "silent mode" in that it will process automatically as per the desired configuration and will make no attempt to communicate with the user. Any communication required such as generated reports will be communicated via email.
Configuration - To set this mode up, run the BRS "Reconcile Cash Book Records" program and configure all the parameters so that when the "Reconcile" option is selected, the process that follows represents an acceptable procedure.
When you then run the BRS silent program, BRSPRS, it will emulate the same run process as the manual one and the associated reports will be emailed to the address specified.Run Automatically - Configure the Windows scheduler to automatically run the BRS in “silent mode” using the SYSPROAuto.exe utility as required. If there is more than one bank set up in the BRS system, all of these banks will be processed when running in "silent mode". If only one bank must be processed, the SYSPROAuto command needs a final parameter (/link=? where ? is the SYSPRO Bank code in question)
Was this helpful?00
Hits: 99 - admin05-12-2018
The BRS Batch report allows the printing or reprinting of the BRS batches that were generated by the BRS transaction processing when the Function was set to Process

Batch: this needs to be an existing BRS batch. The available batches can be browsed and selected. This reports on one batch at a time.
Batch sequence: this only needs to be entered if the exact sequence number within a batch is known. Leaving this field blank will print all sequences within the selected batch.
Un-reconciled Statement records: ticking this field will include the records from the bank statement that were NOT matched to the Cash Book records as well as a reason they were not matched in the report.
Print non-translatable transactions: ticking this field will include the blank or miscellaneous records from the Bank statement files that will have an “X” in the Type as well as XXX in all the fields as they are non-translatable in the report.
Reconciled Cash Book: ticking this field will include the records from the Cash Book that were reconciled within the batch selected in the report.
Un-reconciled Cash Book: ticking this field will include the records from the Cash Book that were un-reconciled within the batch selected in the report.Was this helpful?00
Hits: 99 - admin04-09-2019
The BRS Audit report will print all the audit records created by the associated BRS batch runs with a bank and caters for date specification as well as reprinting. The user is also able to delete the audit file from within this process.

Clear Audit File - this button will delete ALL the Audit File records for the company the user is signed into.
Bank: this needs to be a valid bank. The available banks can be browsed and selected. This reports on one bank at a time.
Reprint records – if set to “Yes”, the report will be produced for all records in the selected date range whether previously printed or not.
Date selection – selecting “Single” will only allow entry of the “Date from” field. “Range” will allow entry of the “Date from” and “Date to” fields. If “All” is selected, the audit records will print in date and time sequence.Was this helpful?00
Hits: 63


